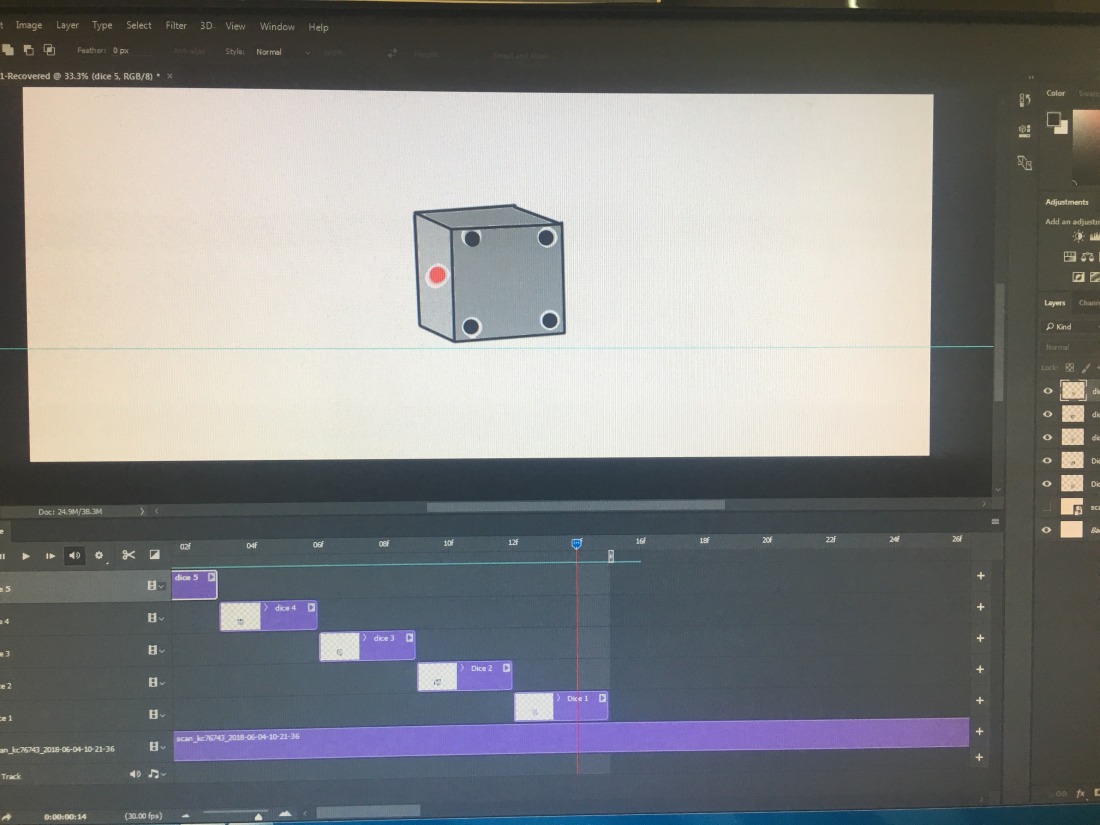
For this task w were tasked to create our first animation. We were task to animate a moving dice which would be captured in 24 frames . The dice would be drawn on Photoshop using separate layers for the 5 faces.
Once the layers were drawn proceeded to animate the dice by opening the timeline and reordering the layers of the dice. This would enable me to play the animation. As well as this I also shrunk down the time of the layers so that each frame would not be overplayed and would enable me to make my work organised.
Throughout this unit, we have been tasked to create a 30-second animation highlighting factors about Eadweard Muybridge. This evaluation will cover the key factors that contributed to the completion of my animation. In addition to this, I will discuss the disappointments I had with my animation and what I could have done better to improve it.
Beginning
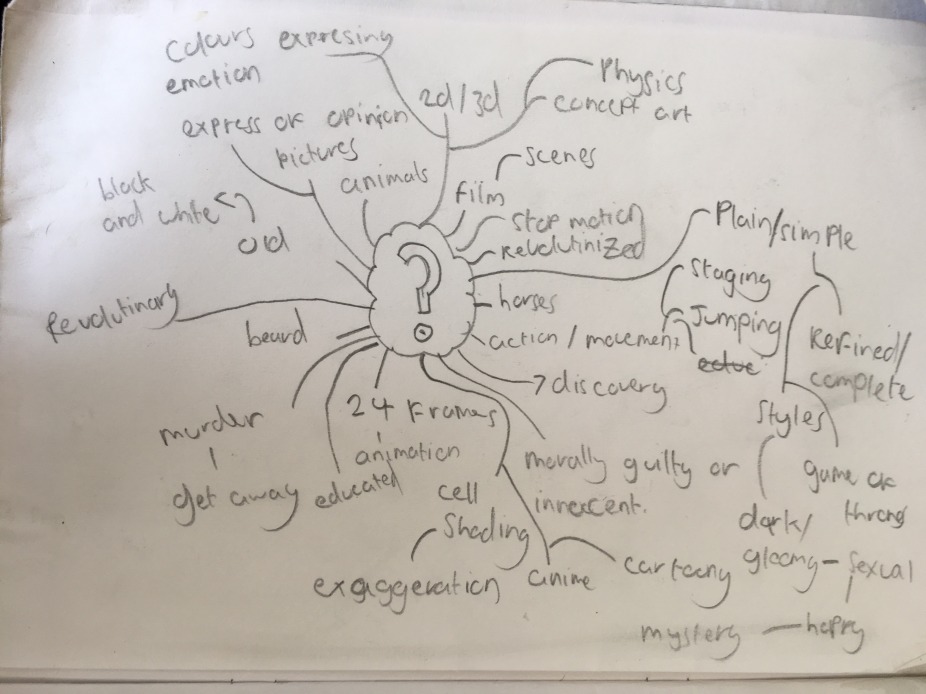
At the very beginning before I could start with any practical work I had to come about with a basis of what I was creating, A plan. I was told by my teacher that planning is just as if not more important then the actual animation. ( before any animation took places the animators of Lion king would go to the zoo taking photos and studying lions for years) Having this in mind I filled a couple of ages in my sketchbook purely brainstorming facts about Eadweard Muybridge as well as different animation media that I felt would aid in my animation
As you can see from my references I took ten minutes on each page finding and writing down as many facts as I can about the topic and media. I feel this aided my work as I was able to graph a solid story to accompany my animation as I had now known and had a written record of many different facts about Muybridge such as his achievements, His shocking arrest and much much more.
As I mentioned before I had solid facts to start creating my story. Unlike many other animations, I wanted my animation to be portrayed as a story incorporating both animation and a large quantity of text equally. I was aware that I had a small time frame of 30 seconds so I came up to a final conclusion of portraying my story through a trailer.
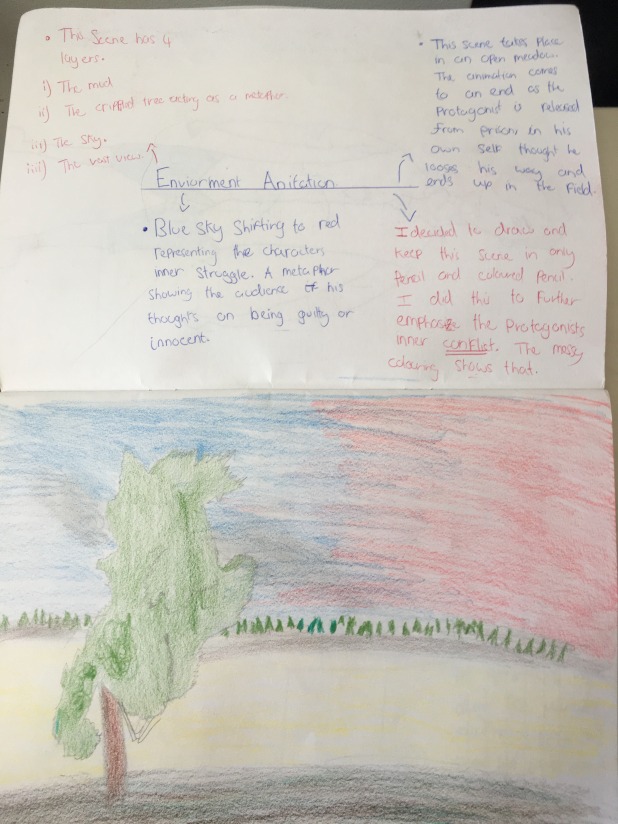
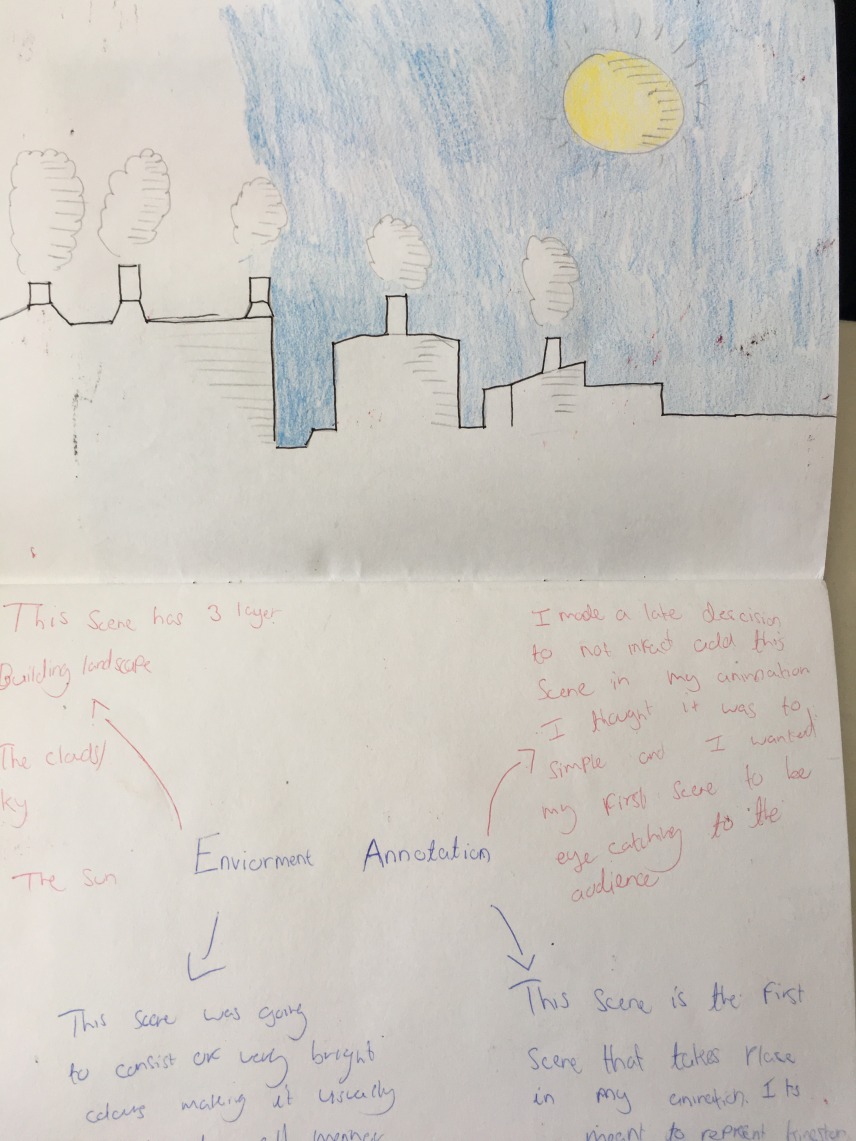
Now that I had framed how my animation would look, I focused on creating environments for my animation. This part of the planning was fairly easy for me as I already had references that I found online. I dedicated four separate pages each continuing a sketch of my environment and a detailed analysis of each environment. within my analysis, I would address to myself Who, What, When, Where. I wanted to not only draw out these environments but to know what was happening in each scene. I made it clear that each environment had its own purpose and gravity to my animation.
As you can see from The images my environments were not meant to be drawn perfectly as I would be scanning them into photoshop later and finishing them digitally, however, I just wanted a rough draft of what my environments looked like and what color scheme would be used and where?
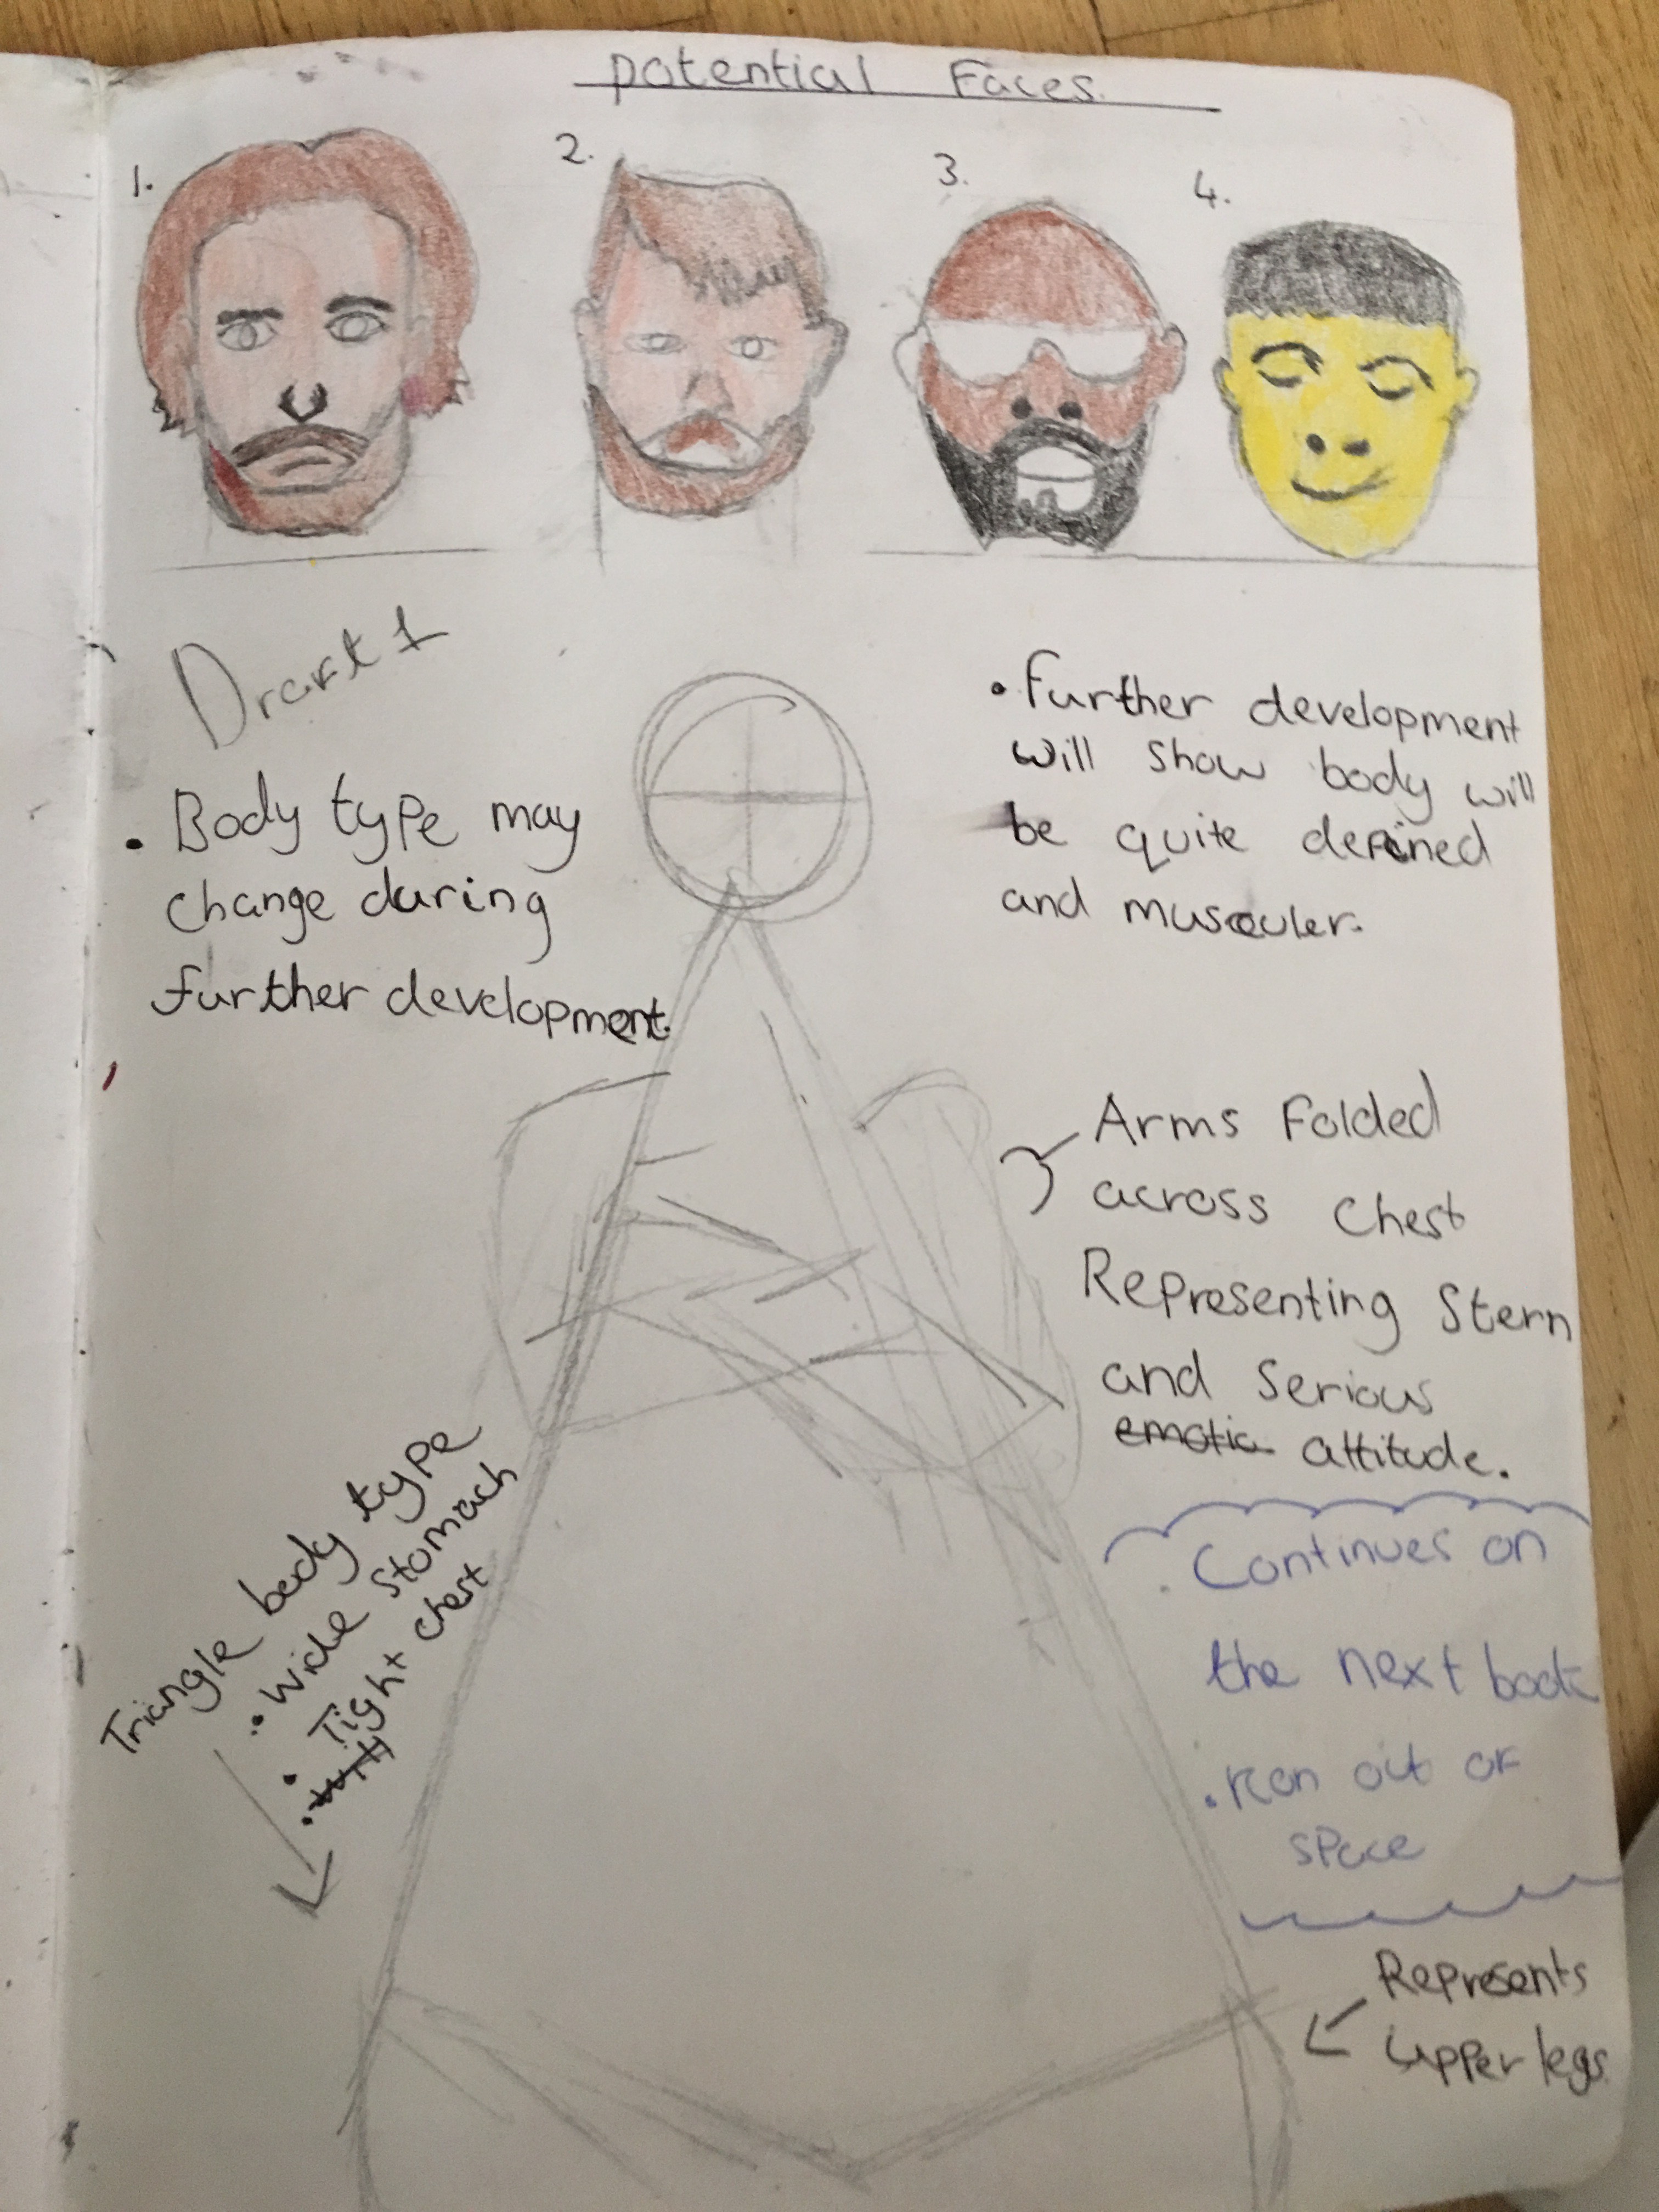
As my environment designs were completed fairly quickly I decided to dedicate all my effort and time into my character design. I new My character would be the most challenging aspect of my animation planning, I discovered form this project that I constantly have so many ideas in my head and because of that, I tend to overcomplicate my work which I Unfortunately did when it came to my character.
Firstly I spent time analyzing the human anatomy sketching and drawing human figures in different positions and postures.
I felt this was a necessary step as it would help me be more familiar with my character. I believe that posture and body type portrays a character’s personality as well as there speech. An example may be Winnie the Pooh. You see characters like ior who slouches a lot and takes very slow paces. This shows that he is a timid and laidback character. I wanted my character to showcase a good amount of personality using the same technique.
Once I studied different postures I decided to look at body type. At first, I showcased my character to be quite butch and big. To represent this I drew out a triangle the bottom half representing a wide stomach. I then annotated. my work giving myself an understanding and explaining why I have chosen these certain body types and decisions.
Through all my vast research I finally drew my Character out. I decided to alter my idea of him being bulky and went for a more simplistic basic body type. The reasoning behind this was due to time constraint. I, unfortunately, spent so much time on the character that I was rapidly running out of time to complete my animation. I new My character couldn’t be over the top so I decided to simplify it. The final result is shown below.
Storyboard
I have made this a separate paragraph as I believe the storyboard was one of the most important parts of my animation. I say this as My storyboard enabled me to piece together my whole animation. not only did I know what my animation would look like but from making a storyboard I was able to actually implement changes and improvements to my animation from looking back at my storyboard and finding certain scenes that I would cut from my final product.
From now on anytime I personally create a new project of this media I will always create a storyboard beforehand. It makes my thoughts and work more organized as well as enabling me to look back and reflect on scenes that I may want to cut or improve on.
In addition to this, I decided to create one more character to give more emotions to one of my sense that being the prison scene. The character is a female inmate. I chose to change the gender as I believe it adds more mystery to the plot. I am hoping audience members will overthink and wonder who she is and what the situation is.
Middle
Now that I have completed my initial planning I decided to actually start animating. Firstly I decided to go to photoshop and layer my character. in order to make his limbs move I have to layer each limb on photoshop so I could allocate these limbs as Riggs on after effects.
After doing that it was a simple task of importing the layers on aftereffects and rigging them using the parent and link tool. This allows each limb to be accessible oot the user joining them to your chosen body part.
Now that my character was joint together I decided to begin adding keyframes. The first scene where Edward (the protagonist) is seen is the second scene 15-22 which takes place upon a stage full of people watching him. Within this scene, I wanted the protagonist thewave his hand as he addresses the crowd. I did this by highlighting the left hand lower arm and upper arm and using the rotation keyframe to rotate the entire arm up and down creating a hand waving motion. After editing the timing appropriately I was able to create a wave motion that was natural and realistic. Reflecting back on this scene now I am pleased that I achieved my goal of getting the character to wave, however, I do believe improvement is necessary. I felt there was so much more I could add to this scene in terms of actual animating. I felt only making my character wave didn’t show any personality towards the character. If I actually added a certain posture towards the character as well as maybe making him interact with the environment more the audience would feel more deeply connected to the protagonist.
My third and final scene took place inside a prison cell. Within this scene, the audience meets my second character, Andrea. My goal was to make this scene short but sweet. The scene itself had a duration of only 5 seconds however unlike the second scene I felt I was able to animate the character accordingly. I first altered the scale of the scene close up on the characters face, I did this as I believed it gives off an effect of intimacy and isolation which is a perfect setting for an inmate enclosed within a prison cell.
Secondly, I decided to make the inmate slowly walk left at the door. As the character’s body wasn’t in the scene, all I needed to do was animate the top half of the body. I did this by playing with the keyframes altering the position of the inmate. I would move the character up and down and since she was so zoomed in these alterations would create the illusion of the inmate walking across the screen.
Lastly, I felt I needed to add in one more animation implication to this scene. I decided to make the eyes move side to side. It’s a small detail however I felt adds more emotion to the scene. The inmate felt more lifelike and not as robotic as characters from prior scenes. Like before I altered the positions of the left and right eye layers making them move side to side.
Lastly, for my first scene my, I added no animation whatsoever. I wanted to add a solid title/introduction to my animation/trailer as I believed that an eye-catching title will grab the attention of the audience better. Aswell as adding a title with text, I decided to use photoshop to create my first environment within that scene. By using photoshop I was able to create a scheme that was different from the rest of the environment by using methods such as destructive/ nondestructive instead of just scanning and going over an environment that I drew. My final product was an original piece that represents the streets of Kingston.
Self-evaluation
In conclusion, I believe that I have created an animation that ticks the requirements of what I have been set to do for this unit. I believe there were some positive outcomes from this animation such as my final scene being animated to my desire. Aswell as my clear improvement of digital art. As well as this I believe I am now more confident with software such as Photoshop and aftereffects, since being required to use these software daily I have learned many technical commands and overall structure. I think with more time and practice my skills will sharpen.
On the otherhand, I also look back on this project and understand what I could improve on for next time. I believe firstly time management is a big issue. If I managed my time better and in fact started working on my animation earlier I believe I could have created characters with more depth and personality. As well as this I also regret not expanding on my second scene within my animation. I believe there was so much more I could have added to the scene through the use of animation and rigging. Next time I may implement tools such as Duik in order to rig my character easier and more efficiently.
finally here is a link to my evaluation survey where my peers took part in assessing and evaluating my work.
Throughout this unit to accompany our 30-second animation we have learned how to. record/implament sound and then transfer it into our animation with the hope of creating a more realistic and immersive experience the audience.
Beginning
Before I was to sample and create tacks using the various software I wanted my animation to be complete. I say this as I would have an idea of what times and where my sound would fit in my animation. I wanted to create a piece which was seamless with my animation. As well as this I wanted an overall theme to my animation. To achieve this Looked at some major blockbuster fils that implement a character or movie theme, And then I started to create my own.
God of war 4 main OST
From researching and taking notes from these themes I also noticed some unique sound techniques that I could implement. Examples may vary from the Diegetic or nondiegetic sound. Would my animation contain nondiegetic sound making the scene more dramatic however the characters within the world wouldn’t react to this music or would it be Diegetic where the music is playing within the scene?
MIddle.
During class, we were instructed to go and complete a spotting list which would contain various sound effects which would eventually be implemented in our animation. Unlike finding or creating the main theme for the animation this spotting list would contain a category of sound effects that I would use to make my animation more lifelike and immersive. Examples may be a recording of a group of people clapping representing a huge audience giving recognition to the protagonist or maybe chains rustling giving the impression that someone is locked up. Beforehand I was going to use my phone recorder to originally recording some of these samples however I was told by my teacher that there are much better alternatives. We were all introduced to the collages state of the art recording system. The difference between that and phone recorder is the fact that these recorders shown to us were able to muffle out any background sound. This enabled me to record any samples I required without any interference that would, therefore, hinder the clarity of my sound.
Now that I had the tools to create my sound effects all I did was actually go out and record them. The teacher allowed us to go out in groups to various parts of the college and record our sound. I and a group of friends went to the park to sample sounds for each of our animations. When it was my turn I had the recorder held in one hand and was ready to record. I instructed my friends to all clap repeatedly in unison creating the sound effect of a crowd cheering. I gave them little instructions as I wanted these cheers to be as lifelike as possible. For my second sound instead of infact manipulating and recording steel chains rustling, I was short on time so I, in fact, went on a website that sample sound effects. (Soundbible) and downloaded an mp3 file of chains rustling.
As I now had all my sound effects I decided to edit them myself using my own skill set and software. Usually I ould use logic as that’s the software that has been taught to us all through this course however as I was pressed for time and new I could not have edited my sounds at college I asked if it was ok to use Audition cc as I already had the software pre-installed on my laptop at home. (Audition cc is a is a digital audio workstation from Adobe Systems featuring both a multitrack, non-destructive mix/edit environment and a destructive-approach waveform editing view) When I was told that I could I went back home and started editing these effects on audition.
I started with the crowd cheering. I knew I wanted the audience to notice the sample as Iit helped with the overall scene however I new my man theme would also be playing over it. To compensate I Lowered the amplitude of my samples so the lower frequencies wouldn’t clash with my OST and overshadow my theme.
It was a simple task or importing the file into audition cc, and then editing the amplitude with the symbol shown above.
Now that my animation is complete I decided To implement my OSt that would consistently play through the full 30 seconds of my animation. MY animation is loosely based on a murder plot that I have created. To fit with the theme I instantly researched and played around with audition cc Meshing samples of various instruments until I found the right template.
After Many different atempts, I came to the causality that I was overcomplicating. my post. I am a firm believer that simplicity is always more. Having that in mind now I decided to go for one instrument that would loop throughout my whole animation. I drew inspiration from my friend as he had a piano piece set. It had an sc He sent my this piece and I scaled it down to thirty seconds., this was so it could match perfectly with my animation without sounding out of place. My final product was a piece that would gradually rise n tension this is called ( cinematic tension). As the animation would play on the piano would play more frequently in smaller intervals. As well as this more keys would be played simultaneously. This overall effect created a sense of tension as now the piano was sounding incredibly out of control. keys were being pressed so fast and loud that there was a sense of danger and lack of control. I believe lack of control scares people as we always want to feel in control, it gives us a sense of sanctuary. Nearing the end of the animation when all the action had been revealed the piece seamlessly calmed down. This was the pinnacle for my animation as the variety of tension shown throughout the piece sculptured when my animation would start and when it would eventually climax. The audience would now know when tension would start to disperse as the music slowly dispersed.
Self-evaluation
To conclude, I am most pleased with my piece. I think I have created a theme and sound effects that mesh really well with my animation. Not only do they help mold and sculpture the animation but I also believe they help give another layer of emotion to the animation. Before sound was implemented my animation was almost lifeless. There was no clear beginning or ending, Nor was there any sense of realism between scenes. Now, however, everything has come to place and I believe the sound can give audience members something to enjoy. I do believe that I could improve upon some things that would have shaped my animation to an even higher level of success. Firstly time management. I felt I did not manage my time incredibly well and in doing that I was required to use a software that I was not familiar with instead of working on logic at the college where I would have the aid of my teacher if need. Secondly, I would have preferred to record all my sounds instead of some of them. If I had done that it would have given me a greater sense of accomplishment as I wouldn’t feel like I was taking someone else’s sound.
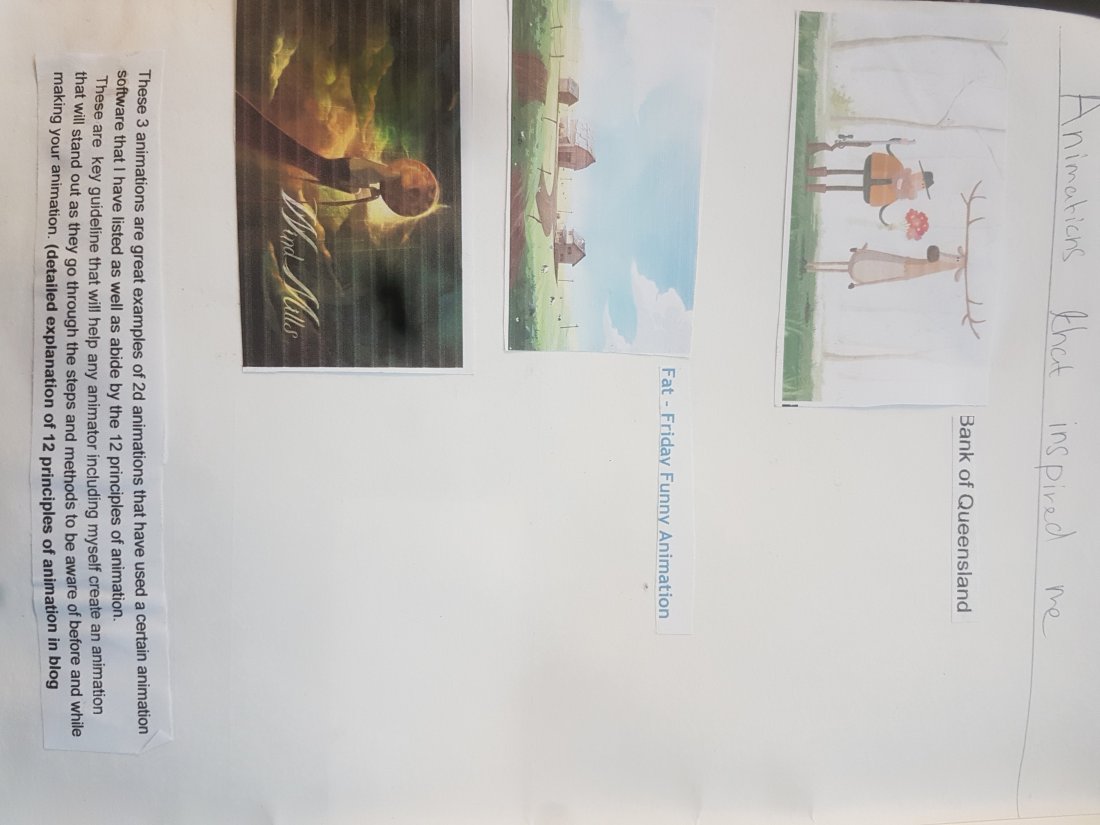
The examples shown above are a few pages taken out my sketchbook showing my own research into animation. I wanted to reaserch how animation is formed aswell as animations that inspire me perisnally aiding with my muybride animation.
As I researched more and more i learnd a few key factors that should aid my animation and give me a greater understanding of the task at hand. Such examples may be the style of animation. Eg: cell shading, exaggerating. I belive my research aided me for my whole project as i am a firm believer thay the more knowledge you obtain the greater your work. I plan on showing further research to aid my animation.
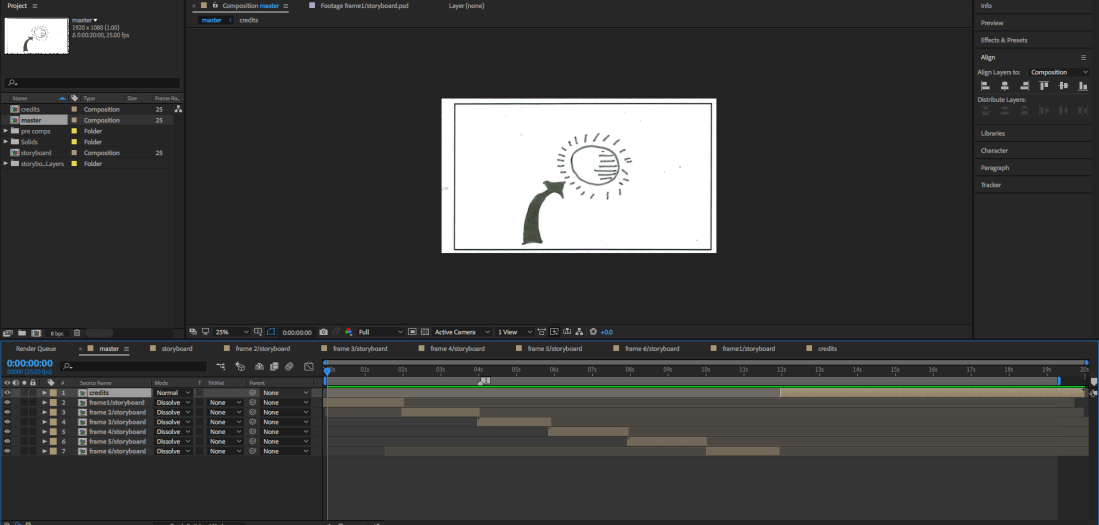
In today’s lesson, we were instructed to finish animating are storyboards on after effects to produce a final finished storyboard. To achieve this end goal there were necessary steps that I had to take.
Firstly I opened photoshop and dragged my storyboard onto a new composition. Once I did that I decided to divide my six slides 6 different layers using the marquee tool. I named these layers frames starting from frame 1-6.
2) upon completion I saved my work and opened after effects. When opened I first saved my work and created a new composition and master. Once that was done I imported my frames and storyboard from my files into after effects. as well as this to organise my workspace I Created a new folder named pre-comps to place all the frames that I imported from photoshop. Finally, I placed highlighted all my frames from my pre-comps folder and dragged them into my master, allowing me to edit these frames within the master.
3) Now that my work is in the master I begin to edit my slides. Firstly I scale my frames all at once so they fit the screen. This is achieved by highlighting all the frames and hitting CMD+ALT+F. Now since all my layers are scaled its time to organise them. I wanted each frame to play in order from 1 to 6 with a time span of two seconds. I did this by spacing out the bars corresponding to each frame separately giving them lengths of two seconds. The end result showcased six frames playing one after the other in order with 2-second intervals.
Final step)
Now I knew I was upon completion of my animatic, however, I didn’t have a clear solid ending to showcase. I decided to create a layer and click on the settings, solid making a solid black layer. finally, to fill in this layer that I had created I went on text and after effects enabled me to clearly type credits showing everyone that I had reached the end of my animatic.
Now My animatic was complete and a video of the end result is shown below.
One task that was given to this new unit was to draw inspiration and complete 8 Muybridge inspired faces all bearing silhouettes. The reason behind this was to convey an understanding of shape within the characters being drawn. As well as this most animators, before finalizing a piece of work would sketch a concept in black and white giving a greater understanding of contrast between colours, in turn, aiding them to create a finalised piece.
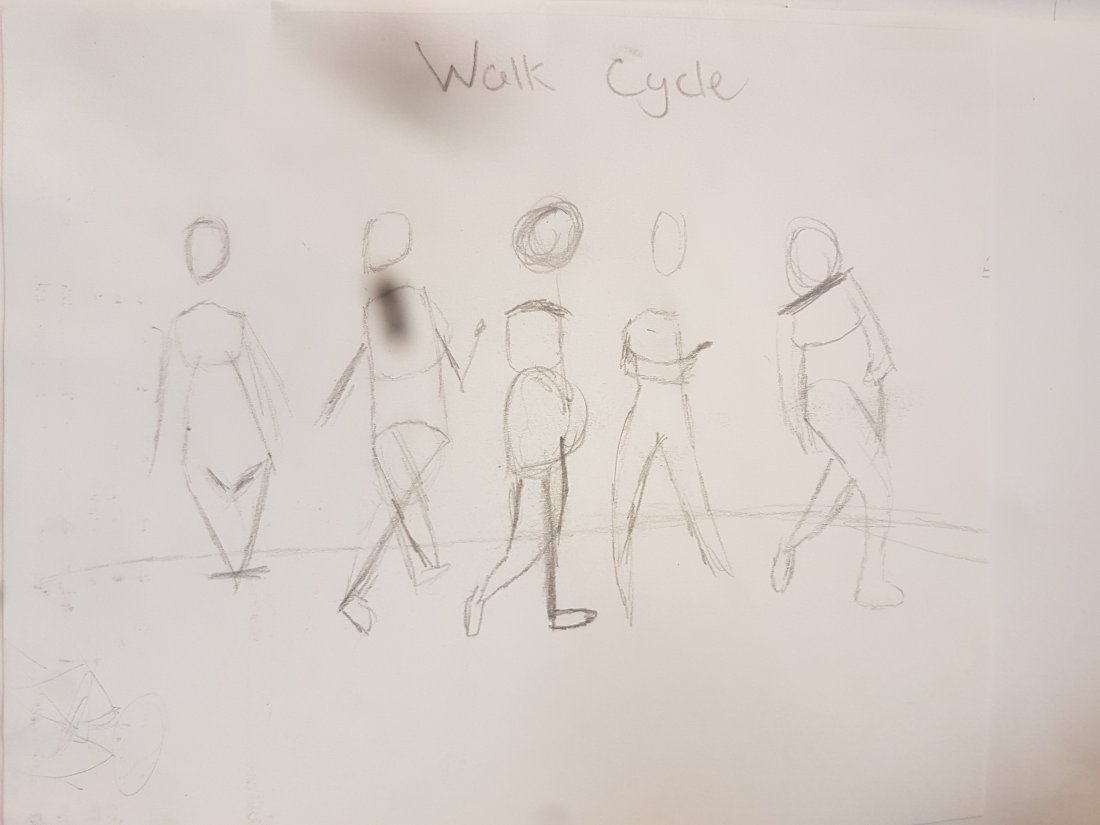
Above is a link straight to my youtube showcasing my examples of different walking cycles. during the lesson, we paired up and videoed each other showcasing different walking moves such as
Proud
Sneaky
The reason behind this task is that Before any animator can start animating we learnt that observation is a key role. Animators would spend months to years observing a specific topic that was linked to there animation. An example would be before lion king could be animated animators spent 3 years in zoos studying and videoing lions, interacting and roaming around, This enabled them to have an exact idea on what they wanted animated so when they produced the animation for the lions they would have an exact idea of what they wanted to be produced. The same concept applies to this task shown.
In todays lesson we completed going through the 12 principles of animation and preceded with the next excersises. We were instructed to create a 3d planet animating it to rotate.
So firstly I created my composition called master. after that I created two folders called Assets and pre comps to help organise my work
After I did this I proceeded to download the textures sent to moodle which I placed in my finder
I started by placing the venus texture under my masters folder and renaming it.
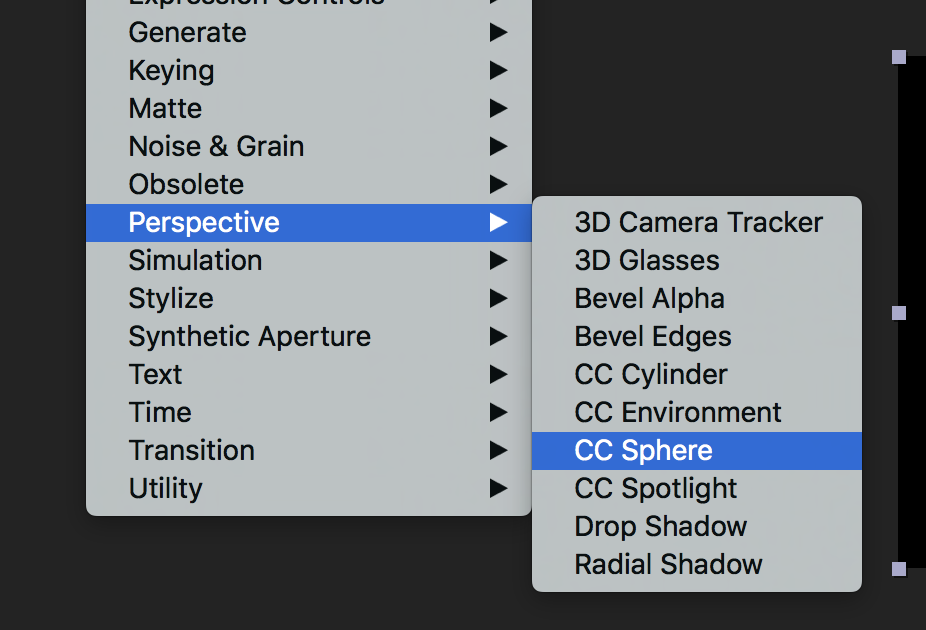
Since the textures received were only templates we had to manipulate them and transform them to spheres to resemble a planet. In order to do this I used the effects given by after effects and used cc sphere to change the template to a sphere
By the time it was done it looked like this
All that was left to do was make the shape rotate. In order to do this I added two keyframes to the rotation bar.
After altering the seconds i got the planet to rotate a full 360 and keep on spinning on loop.
As well as this I restricted the composition to 5 seconds to not overcomplicate my work
By the end I successfully manipulated the texture into a sphere and allowed it t rotate 360 degrees on loop