Spot Healing (morgan Freeman)

In today’s lesson, we were introduced to the spot healing tool. What this tool does clone areas from an image and blends the pixels seamlessly to create a smooth effect hiding any unwanted pixels.

photoshop-spot-healing-brush-tool


After being explained what and how to use Spot healing we were given a task to complete using the tool. We were given a raw mugshot of Morgan freemen. If you analyse the photo you can see each individual feature on his face. We were to use the spot healing tool to get rid of his blemishes until his face was completely free of any natural features such as zits, spots, and Dimples. The results are shown below.

Raw Image

Morgan-Freeman

Edited image

Screen Shot 2017-10-11 at 13.20.00


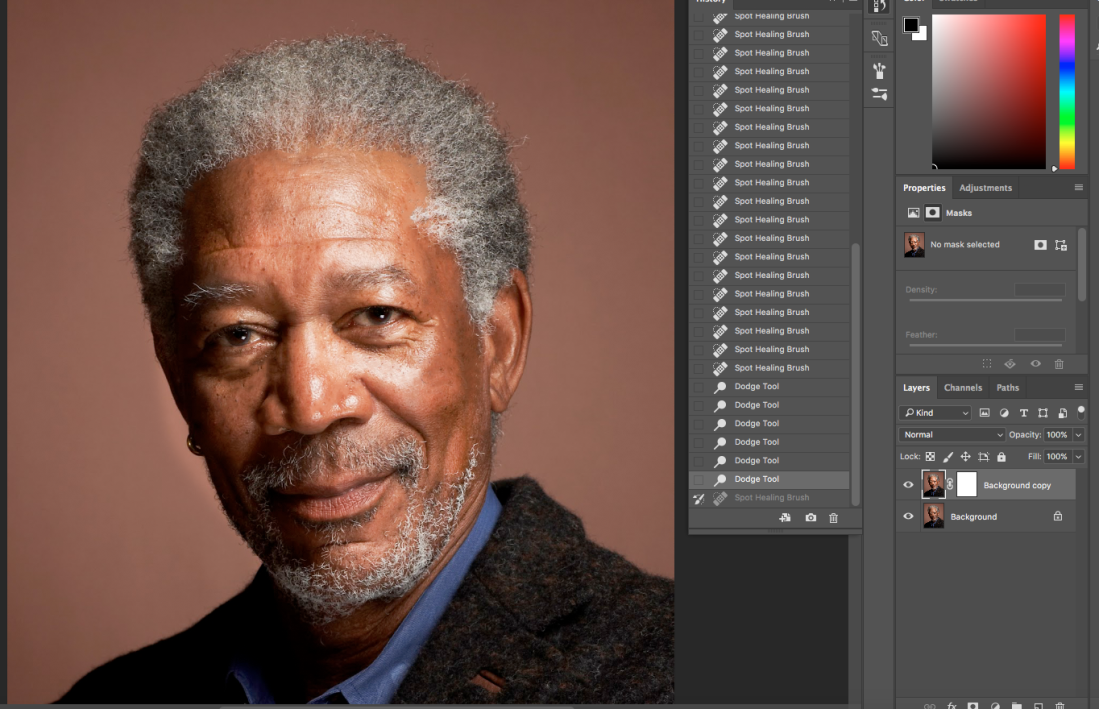
As well as using the spot healing tool I also used the dodge tool as shown in history to lighten parts of his face to make it visually appealing.


As you can see from the two samples I showed once I was done editing the image Morgans face was cleared of all his facial features giving his face a new edited look that also looks realistic.

Asset Manegment.

Screen Shot 2018-01-03 at 12.47.42.pngScreen Shot 2018-01-03 at 12.47.35.png


On one of our very first lessons before we could actually start using Photoshop, we were instructed to create three separate folders for our work. These folders would individual store and help organise any work completed.

The three folders were Image (store any images or raw work that I would use to edit in photoshop)

Export( to store any sent images or finished files)

Psd( store all your Photoshop documents)

I Now realize the potential and importance of this task. The reason We were instructed to create folders before we could work was simply to help us organise our work.Instead of scattering our work everywhere these folders allow us to store and find any work, image we need.  Personally, I’ve found it convenient when I had to retrieve old work to post on my blog. I was able to identify and find the work I required.

Clipping Mask. Photoshop

As I could not attend today’s lesson I decided to catch up and do the work independently. I worked using research on various sources on the internet as well as asking peers for help.


step 1) I browsed and searched an image of autumn. I did this as the task was to do the process of clipping make for the 4 seasons, Autumn, Winter, summer, and spring. once I found the image I saved it and pasted it on my photoshop.

Screen Shot 2017-11-22 at 15.47.51.png


step2) by using the shortcut T on photoshop or better known as textbox I was able to produce writing on the image.  As shown below I wrote the word autumn.

Screen Shot 2017-11-22 at 15.43.32.png


step3) this step was the most intricate however the end result made the image look amazing.

Howe I went by attempting this step was to first take my layer of autumn and place it ontop of my text layer. It should look like this is done successfully.

Screen Shot 2017-11-22 at 16.01.09.png

now the next is to hold the left mouse button in unison with alt. Once doing that you should see an icon appear on the bottom left of the layer.

Screen Shot 2017-11-22 at 16.03.56.png

as you have now achieved all those steps click the icon shown above and the clipping mask should form, with the whole autumn background synching with the writing. You should be left with an end result as such.

Screen Shot 2017-11-22 at 15.43.02.png


I still have yet to complete the other 3 seasons however as I find the time I will be completing them all. This was just to show proof and understanding of the task being set.

Collectively I see the benefit of this task as If I choose I could use this process for the title of my video game> not only does this give me more creative possibilities but it has also allowed me to become more versatile with photoshop allowing me to implement this task into everyday life if so choose.

Screen Shot 2017-11-22 at 18.26.22.png


Screen Shot 2017-11-22 at 18.34.21.png


Screen Shot 2017-11-22 at 18.39.15.png

Colour shading. Adobe cc

Today I was told by peers that we had to open adobe cc and play around with color templates that could be potential templates for our game. As I wasn’t in the lesson I had a vague idea of how to tackle this process, however, I decided to do my own independent research and looked up tutorials on :

YouTube.https://www.youtube.com/watch?v=ZLXf01OrVPQ.

As well as this I also thought it would benefit me if I ask my peers what they process they went through which indeed helped me in the end.  I looked at David’s work for inspiration and eventually came to grips with the task at hand.

Screen Shot 2017-11-21 at 17.54.14.pngScreen Shot 2017-11-21 at 17.54.00.png

Down below is to examples of the work completed on Adobe cc. ON the first photo I was presented with a colour wheel where I could blend and make my own colour using pinpoint accuracy. I repeated this process with all five templates and as you can see below produced 5 separate colours that I can and will use for my game.

In order to achieve this all, I had to create a custom colour rule in order for y colours to be authentic and personal.

I believe this task was relevant to my pitch as it is a starting point to what my colour layout will be like. Eventually, I will expand from this and coat the games interface and layout with these templates.

Typography Tutorial

Typography is a series or type of writing style. A text stays the same no mat­ter how it’s ren­dered. An example of this is “I like pizza.” I can print that text on a piece of pa­per, or read it aloud, or save it in a file on my lap­top. It’ll be the same text, just ren­dered dif­fer­ent ways—vi­su­ally, au­di­bly, digitally. Be­ing an ef­fec­tive ty­pog­ra­pher is more about good skills than good taste


Typography also may be used as a decorative device, unrelated to the communication of information  It’s central to the skills of a designer and is about much more than making the words legible. … But good typography is often down to creative intuition.


I decided to include typography as it will be an essential part of my final pitch for my Video Game. Not only will it allow me to experiment and understand the uses of fonts of ray game but it will also prove that I have Learnt and understood the concept behind the material.


Image result for typographyRelated image


Non destructive /Destructive part 2 Content aware

For today’s lesson with Kieran, We touched upon destructive and nondestructive methods again. Were given an old photo of a boy on photoshop that we had to renew, making it look fixed and presentable. Screen Shot 2017-10-18 at 12.42.39

Original image that we had to touch up.  As you can see image contains bent corners and ripped lines. 


Firstly what I had to do to get rid of the tears on the picture was use the spot healing tool as shown in the image below. FUN FACT: If you also notice to the right of the image it shows how many repeated time I have used the spot tool. This effect has been caused by the history tool.  The History Palette in Adobe Photoshop is an efficient tool that allows you to undo/redo multiple states of an image.Screen Shot 2017-10-18 at 13.06.39

Pay attention to the image now. Compared to the original the image now only has very few tears near the middle. The spot healing tool allowed me to get rid of most of them.


This piece of work I completed was an example of a non-destructive image. I say this because I added a layer and mask that I developed onto my image. This allowed the image to be rectified upon alteration if I deemed it necessary.


photoshop lesson 4 adjustments Mini non destructive

In today’s lesson, we went through more tools and tricks to use on photoshop. We learned the term adjustments and what non-destructive and destructive means.

-Non-destructive = ondestructive editing is a method of editing in Photoshop that allows you to make changes to an image without overwriting the original image data.

Destructive= allows you to make changes to an image on photoshop however unlike NDE once you make a change you can’t reverse it and it infects changes the image permanently destroying the previous pixels thus being called destructive.


Screen Shot 2017-10-05 at 10.02.37

Above is a zoomed in image of the non destructive piece I did. I Decided to post this picture as it shows some of the steps I went through to see my Non destructive  image developed. So firstly you can see that I have two layers beside my picture. The first is for the decal That I place on the hood of the car and the second is the background itself. I decided to edit my decals and on one layer as that means if I want to remove it in the future or make changes to it I can without harming the actual image itself. As well as this I decided to also coat my car in green. When I completed this I ran into a occurring problem which was It didn’t look realistic enough. To rectify this I highlighted my coat and changed it to linear burn. This gave the cat a glossy but realistic finish. It helped define the paint as well as add reflection when needed.


This is what my final product looked like for my Non destructive piece. As you can see I madealot of changes. I changed the colour scheme added decals  and tinted the windows.  Although it is complete I still need to touch up on the hood and bonnet of the car finishing my rendering so both parts look the part, however besides from that This is an example of what type of tools and tricks you can implement to creat a non destructive piece

Screen Shot 2017-10-05 at 10.07.09

Photoshop tutorial. Past and edit photos


In todays lesson with Kieran we learnt how to copy and paste images onto Photoshop, as well as this we learnt to to render and resize them using the concept of size and pixels that Kieran thoroughly went through. the picture above is an edited version of a city landscape found on the internet. Firstly I changed the background completely from sky blue to my own shade of blue which you can see. I then touched the image up by creating my own moon located on the top left of the  picture. I created the tool using the Marquee tool. Off course if I wanted to I could of copied and pasted a moon from the internet but I wanted to attempt to make one myself.

Photoshop Tutorial guide.

Photoshop introdution14917


Within this link is a tutorial guide on all the knowledge that I have obtained throughout my lessons with Kieran so far. examples may very from simple commands such as  explaining how to zoom in/ out to more intermediate tools like the lasso. As I obtain or knowledge on this course I will be constantly updating this folder so I can allow myself to remember and apply the knowledge that I am learning. if you would like to view the document just click the link and it will guide you to a word document.