Storyboards- After effects Animatic

In today’s lesson, we were instructed to finish animating are storyboards on after effects to produce a final finished storyboard. To achieve this end goal there were necessary steps that I had to take.

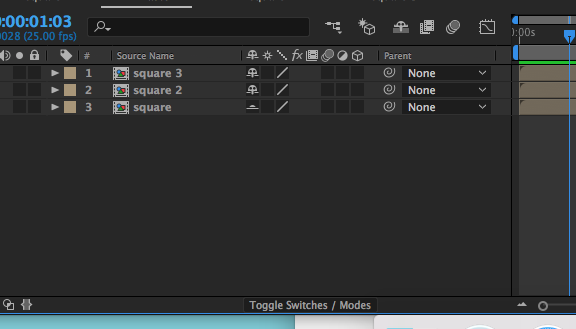
  1. Firstly I opened photoshop and dragged my storyboard onto a new composition. Once I did that I decided to divide my six slides 6 different layers using the marquee tool. I named these layers frames starting from frame 1-6.
  2. Screen Shot 2018-03-14 at 13.03.08.pngScreen Shot 2018-03-14 at 13.03.12.png

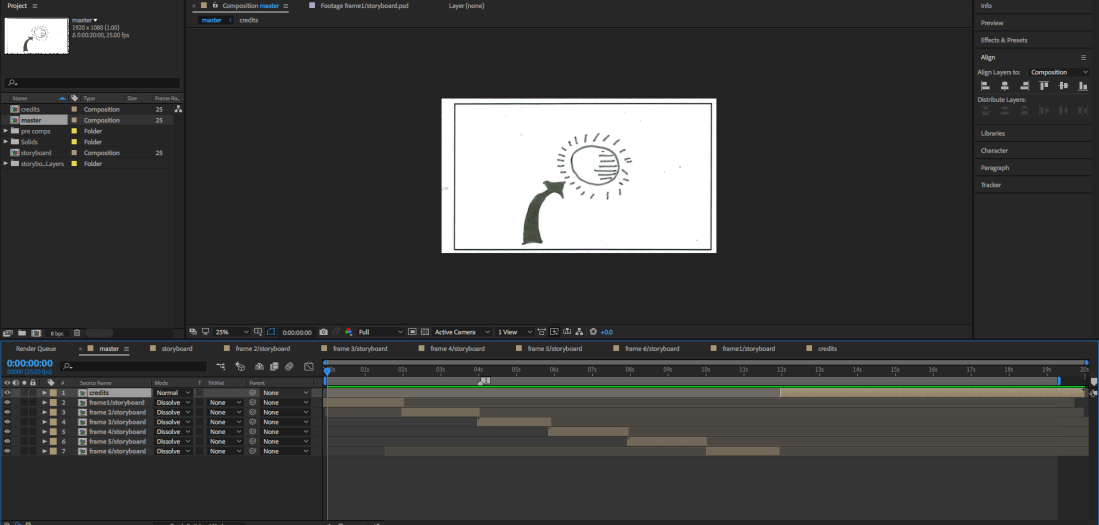
2) upon completion I saved my work and opened after effects. When opened I first saved my work and created a new composition and master. Once that was done I imported my frames and storyboard from my files into after effects. as well as this to organise my workspace I Created a new folder named pre-comps to place all the frames that I imported from photoshop. Finally, I placed highlighted all my frames from my pre-comps folder and dragged them into my master, allowing me to edit these frames within the master.

Screen Shot 2018-03-14 at 13.08.00.png

3) Now that my work is in the master I begin to edit my slides. Firstly I scale my frames all at once so they fit the screen. This is achieved by highlighting all the frames and hitting CMD+ALT+F. Now since all my layers are scaled its time to organise them. I wanted each frame to play in order from 1 to 6 with a time span of two seconds. I did this by spacing out the bars corresponding to each frame separately giving them lengths of two seconds. The end result showcased six frames playing one after the other in order with 2-second intervals.

Screen Shot 2018-03-15 at 12.02.12.png

Final step)

Now I knew I was upon completion of my animatic, however, I didn’t have a clear solid ending to showcase. I decided to create a layer and click on the settings, solid making a solid black layer. finally, to fill in this layer that I had created I went on text and after effects enabled me to clearly type credits showing everyone that I had reached the end of my animatic.

Screen Shot 2018-03-16 at 16.26.08.png

Screen Shot 2018-03-15 at 10.22.28.png

Now My animatic was complete and a video of the end result is shown below.

After effects Planets

In todays lesson we completed going through the 12 principles of animation and preceded with the next excersises. We were instructed to create a 3d planet animating it to rotate.

So firstly I created my composition called master. after that I created two folders called Assets and pre comps to help organise my workScreen Shot 2018-02-01 at 15.44.00.png

After I did this I proceeded to download the textures sent to moodle which I placed in my finderScreen Shot 2018-02-01 at 15.46.39.png


I started by placing the venus texture under my masters folder and renaming it.Screen Shot 2018-02-01 at 15.52.03.png

Since the textures received were only templates we had to manipulate them and transform them to spheres to resemble a planet. In order to do this I used the effects given by after effects and used cc sphere to change the template to a sphere

Screen Shot 2018-02-01 at 15.15.56.png

By the time it was done it looked like thisScreen Shot 2018-02-01 at 15.15.45.png


All that was left to do was make the shape rotate. In order to do this I added two keyframes to the rotation bar.Screen Shot 2018-02-01 at 15.55.26.png

After altering the seconds i got the planet to rotate a full 360 and keep on spinning on loop.

As well as this I restricted the composition to 5 seconds to not overcomplicate my workScreen Shot 2018-02-01 at 15.57.49.png

By the end I successfully manipulated the texture into a sphere and allowed it t rotate 360 degrees on loop

After effects basics

    • New project to start the project.
    • Project pan, composition panel and timeline
    • Before open up the software asset management and create folders to organize your work.
    • When clicked it panel get blue highlight
    • Project to import to analyse project.
    • To group layers you use composition
    • The interface is organized into a group of workspaces.
    • Names of workspaces are named after different things or tasks
    • Text or space for a lot of text.
    • Can access standard through shortcuts.
    • Import assets into the project.
    • Double click inside project panel
    • He present folder.
    • Hover between the column and click and drag to make name Coolum larger.
    • To create compassion you go choose a new composition. Under preset choose a lot of presets to use.
    • Preset responsible for frame rate and aspect ratio
    • 0:00:00:00=frames
    • Start time and end time you can set with compassion.
    • click on the clip and drag down to the button of the lower panel. ( blue play head)
    • Drag up and down timeline and composition moves.
    • When let go of time indicator you see how many frames your compassion is
    • You can alter your frames on the left if you so choose to.
    • You can make adjustments to the anchor point, position, scale, rotation underneath transform options.
    • Anchor point= locator. Position point.
    • Blue numbers are different parameters you can adjust.
    • If you want to move anchor point you click and drag and moves along x-axis.
    • the scale has a lock it will scale up and down and is locked of y parameter. You can unlock and will distort the compassion accordingly.
    • If you see infinite symbol to unlock
    • To add a colour select layer and then go out effect and you’ll see all options to apply colours and effect. Go effects preset panel and click on the search field.
    • Drag onto the timeline to add effect.
    • Now applied you have effect layer you can edit.
    • Make adjustments up in effect control panel that pops up or inside the timeline on the actual layer
    • Look menu is preset settings in the colour effect that will stylize effect to create a certain look.]
    • Below timeline Toggle switches/modes.
  • Add 2nd video layer
  • To add animation use keyframes which are recorded settings.
  • Keyframes are recording an action ready for a change.
  • Activate keyframe click stopwatch icon.
  • Only click stopwatch once in order for the animation to change.
  • Move time indicator to change time.
  • Adaptive resolution is a way inside after effects you do animation without putting too much strain on the system
  • To preview something press spacebar.
  • Rendering is a term to export video outside after effects.
  • Better to render I the app.
  • Interpolation calculates the in-between frames through

forward/inverse kinematics

After Effects -bascis

Today we went through and completed our first task on After Effects. We went through and were instructed on all the basics of organizing a project(composition).

When making a composition we first had to create a square which we would eventually animate. I named the file square.

Screen Shot 2018-01-24 at 12.24.22.png

Screen Shot 2018-01-24 at 12.24.32.png

I repeated this process two more times and created two more squares on different files.

Screen Shot 2018-01-18 at 10.10.20.png

After creating all three layers I then based the layers all into my composition called master. This enabled all squares to be visible in unison.

Screen Shot 2018-01-24 at 12.07.07.png

Now that all three squares were organized the lat and final step was to animate them altering with the four main components

-Position

-Scale

-Rotation

-Opacity

I mostly used position and what that did was it enabled me to manipulate where my object will go whether that be up, down, left or right.

For my first square, I positioned it to move right across the map, the second would go down and finally my last square I positioned it to zoom right across the composition in unison with the others starting from top to bottom.

I felt I made tremendous progress with this take as I was able to grasp the fundamentals of animation. Now when I animated I will have a basic knowledge of the task at hand thus enabling me to flourish my skills.